WPTwin is so easy to use! Here’s how:
- After you’ve made your purchase and downloaded your wptwin product, you will need to access your website servers. If you do not know how to do this, call your hosting company and ask if they can show you how to access the website servers where your WordPress blog resides. Many hosting companies have tutorials online or have good customer support staff that can help you.
- Once you can see inside the folder where all you wordpress files are located, you need to upload the wptwin.php file into that area.
- You can tell if you did it right by going to your browser and typing wptwin.php after your url. (For example, in the browser address bar, the address should say: http://www.YourWebsiteNameHere.com/wptwin.php)
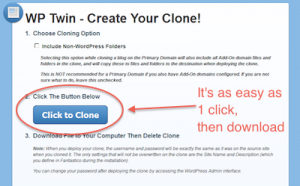
 You will then see a screen that says either you need to login, OR you will see a page that looks like this —>
 - Next, all you need to do is click on the “Click To Clone” button and your backup will start to generate for you to download.
-
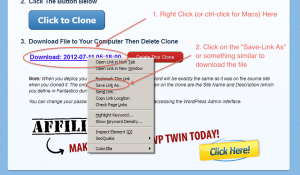
You now need to download the generated “clone” file to your computer and put in on a disc or backup drive so it is in a safe place. —->
- This file is a complete backup of your blog and includes the database as well. If it is small enough, it can be burned on a DVD to be sure that you don’t lose this clone.
Using the Clone to duplicate a site you’ve built in another location
The clone file can also be used to duplicate the look and feel of a site that you already created and like. You can deploy it in its entirety to a whole new location and simply change what you want in its duplicate home. I have used this when trying to build a strong presence in a micro niche market no one has gone after. This technique can save days worth of work! The cloned locations can also be used to test plugins, updates, and risky changes to the code.
How To Deploy The Clone
- Before you can use the clone, you will need to install WordPress on the website you will be using. It will start off as the basic template, which is what you want.
- Now, If you are ready to use your clone file, you will now need to upload the file called wptwindeploy.php that came in your download folder from your order. You will upload that file into the location that you installed wordpress. It should “look” very similar to the folder that you uploaded the original wptwin.php file.
- Upload the clone file that you downloaded from the site you are duplicating. It should end with “.wpt”
- Now type in the new locations website address in a browser and add /wptwindeploy.php to it. It should look something like this: http://www.YourNewWebsiteLocation.com/wptwindeploy.php
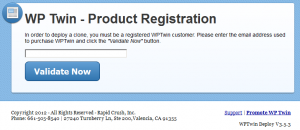
 You should see the following screen. ———–> Enter your email address that you registered when you purchased Wptwin.
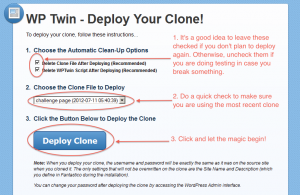
 At this point, you will need to decide whether or not you want to delete the clone after the deploy is done. If you don’t have a backup of the clone, do not let it delete. I recommend downloading it now before you move forward. I also recommend you leave the clone and the main wptwindeploy.php file in place by unchecking the box if you are doing testing. If the site breaks during a test, you won’t have to re-upload them again.
WordPress is not a perfect product and anyone who has done a lot of sites with WordPress will probably have similar horror stories of losing their site. Backing up is a necessity and  having an easy to use tool like WPTwin is worth 10 times what you’ll pay for it. How valuable is your time if you lost all your work tomorrow? For internet marketers, it could be worth thousands a day in revenue. All the pros I know use WPTwin to stay protected, you should too! Get it here —–> https://www.tipsbychris.com/wptwin

