Take a Screenshot of your Windows 7, Windows Vista, or Windows XP, computer screen using these easy steps.
No, you won’t need to download or buy any software, it’s already built into your computer It’s easier than you think! I am going to start with the newer Windows version first because the software (Called “Snipping Tool”) they’ve built into Windows 7 and Vista is very easy to use and works well.
Windows 7 and Windows Vista Screen Capture “Snipping Tool”
- Start by having the item you want to capture on your screen.
- Go to the “Start” menu and select “All Programs”, Then “Accessories”, then “Snipping Tool”. (you can also click start and type in “Snipping Tool” in the search box to get to it)
- Your screen will have a “Cloudy” washed out look to it and a small “Snipping Tool” window will appear. This means you can already drag over the area you would like to capture.
- Hold your mouse button down and drag over the area you would like to capture. Once you let your mouse button go, your image is caught and ready to be saved to your hard drive.
- Play with the tools you see at the top menu to highlight or draw over an area that you want to emphasize.
- Lastly, be sure to hit the save button on the top left once you like what you see or you will lose it if you close out.
Taking Screenshots for Windows XP Users (which will work for Windows 7 and Vista users)
If you are still using Windows XP, you can use the following steps to capture your picture. These steps also work for Windows Vista and Windows 7 users as well, but the instructions above is a lot faster than these next steps.
- Start by having the screen you want to capture on your desktop.
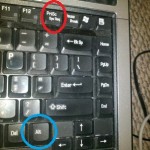
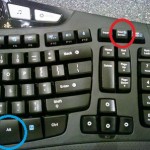
- If you want to screen capture your WHOLE desktop, locate the “Print Screen” key on your keyboard and PRESS IT ONCE. (Most of the time, this key is located on the upper right side of the keyboard. It may also be abbreviated as “PRT SC”. Click on the picture below to enlarge the images.)Don’t expect to see anything happen, all you’ve done is tell the computer to store the desktop image in memory. There are no indicators that tell you its done. If you only want to screenshot the ACTIVE program window and NOT the whole desktop, Hold your ALT-Key down while you press the “Print Screen” Key.
On a Laptop Keyboard, the “Print Screen” key is usually abbreviated at “PrtSc” and located on the upper right side – Circled in Red. The “ALT” Key will most likely be found on both sides of the space bar – Circled in Blue On a Full Keyboard, the “Print Screen” key is typically located on the upper right side – Circled in Red. Tje “ALT” Key will most likely be found on both sides of the space bar – Circled in Blue - Now, you can open your Paint program by going to “Start”, then “All Programs”, then “Accessories”, and now select “Paint”.
- Once you open paint, Select “Edit” and “Paste” (or do a ctrl-V) to insert your picture into paint.
- Now save the file to your hard drive by selecting “File”, then “Save As”. You will be asked to name your file and you now have a screenshot image you can use anytime.
Hope this helps!


Thank you, this is great!
M